How to create a VeriScan Profile
TABLE OF CONTENTS
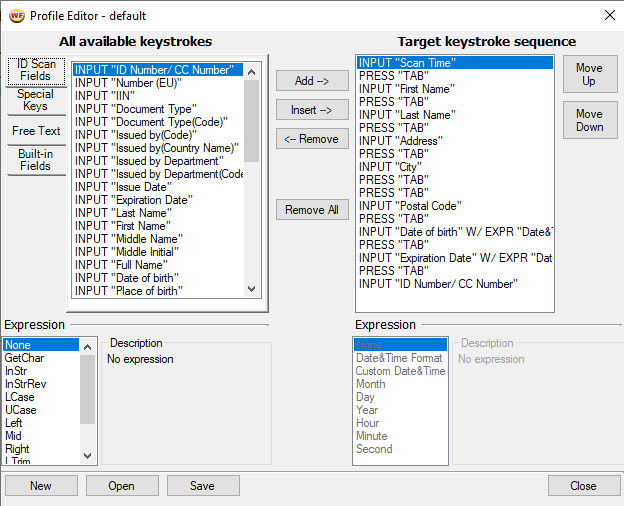
Profile Editor
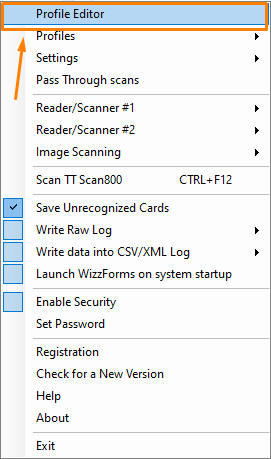
From the WizzForms menu, select the top option, Profile Editor, to begin mapping a custom profile.
Creating a profile requires some trial and error. The user needs to examine the form or application that will be filled out, and then choose the proper inputs to send. These inputs will emulate key presses automatically filling in areas where the user would normally type, and the user will need to include inputs to navigate between fields as well.
ID Scan Fields
These are all the available fields you can pull from an ID, such as name, date of birth, address, ID type, etc.
Note that some fields are Passport/MRZ specific, some are Driver's License/PDF417 Barcode specific, and some are common between both document types.
Special Keys
These are keys such as Backspace, Tab, Delete, Enter, etc.
You can use these keys to navigate between different text boxes (with tab), move around different cells inside a spreadsheet (with arrow keys), or even automatically submit a web form (with the enter key).
Free Text
Here you can add any prewritten string of text.
Simply type the text you want into the box, and it will type it every time that specific input is called.
Built-In Fields
These are specific built-in items that may be useful when automatically populating a form.
RETURN "Now" grabs the current time.
RETURN "Today" grabs the current date.
RETURN "UserID" gets the name of the current logged in user.
DELAY will wait for a specified amount in milliseconds or wait until a specific key is pressed.
The Expression options at the bottom left can be used to define the output in a specific way - selecting None will output the data normally.
Customizing a Profile
Start the profile by selecting New at the bottom left, and assigning a name to the new profile.
For the WizzForms Example Page that will be shown below, follow this link; or check this box during installation: 
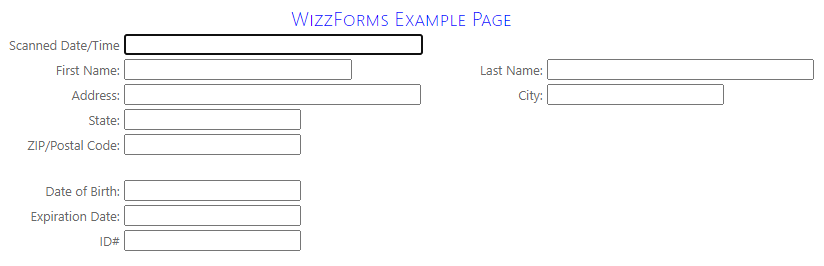
The first step is to examine the document or form being used. Take note of all the fields that need to be filled in; these will be the ID Scan Fields that need to be added to the profile.
In the above example: “Scan Time,” “First Name,” “Last Name,” “Address,” “City,” “Jurisdiction/State,” “Postal Code,” “Date of Birth,” “Expiration Date,” and “ID Number” are the ID Scan Fields needed.
Next, figure out which keyboard keys navigate through the form and how many key-presses are required to reach the next field. These will be the Special Keys used.
In this example, the TAB key navigates between the different boxes, and pressing it once moves to the next box. This means that there will need to be one “TAB” between each ID Scan Field in order to navigate properly . (If multiple key presses were required then multiple “TAB”s would need to be included.)
The cursor always needs to begin in the first field, so make sure to click on the first box before running the scan.
In this example it is the "Scanner Date/Time" field.
Sequence of Inputs:

- The first box needs to be the first ID Scan Field included in the profile. Click on the ID Scan Fields tab, and select the desired input then press Add. (In this example: “Scanned Time.”)
- Next make sure to include a Special Key to navigate to the next field. Click on the Special Keys tab, and select the correct input then press Add. (In this example: “TAB.”)
- Now insert the next ID Scan Field needed. (In this example: “First Name.”)
- Once again remember to include a Special Key next in order to move to the next box. (In this example: notice how “TAB” now moves across to Last Name and not down to Address. This is a good example of how WizzForms requires trial and error: the user will need to make sure to test how the Special Keys navigate through the form.)
- The keystroke sequence will continue in this format ( ID Scan Field, Special Key, ID Scan Field, Special Key,...) until the last ID Scan Field is inserted. (In this example: “ID Number/CC Number.”)
- After the last ID Scan Field, there is no Special Key needed since all fields are complete.
Once you have completed a profile, click Save at the bottom. Make sure to select the profile (instructions below) and test it to ensure it works properly before utilizing it.
Choosing a Profile
The profile you select will be used for every scan. To choose this profile right-click on the WizzForms icon to access the menu, navigate to Profiles, and then choose the profile you want from the list. Any custom profiles will be included here along with the default profiles.
If you wish to select a different profile for each scan, there is a setting for this. Navigate to Settings and then check Select Profile for every scan from the list. M Matt is the author of this solution article.