TABLE OF CONTENTS
- Introduction
- Installing the Reader
- Reading Documents
- Maintenance
- Specifications
- Troubleshooting
- Customer Service
Introduction
The Gemalto Document Reader AT10K is the result of over 20 years’ experience in designing travel document readers for the most demanding customers and environments. With its compact size yet high quality optics it can image travel documents using three light sources and has a Radio Frequency IDentification (RFID) interface for reading eDocuments in one action. The AT10K can automatically capture the machine readable zone (MRZ) data, images and chip data from a variety of personal identification documents, including ePassports, passports, visa and other travel documents as well as decoding barcodes from documents such as boarding passes.
The reader’s small footprint and its ability to image challenging documents in brightly lit conditions with minimal CPU loading on the host PC makes it ideal for use by immigration control, airlines, banks, hotels, and casinos. The readers have no motorized moving parts to ensure maximum reliability.
The design of the AT10K is based on detailed and exhaustive analysis of field experience and numerous deployed projects. With a new “landing lights” LED feedback arrangement and document hold down clip it naturally encourages the correct placement and use of the reader, regardless if the user is left or right handed, maximizing first time read rate for faster customer processing. Gemalto has created a new stylish look that will fit into the décor of the most upmarket customer facing service desks.
| AT10K Without Hood | AT10K With Hood |
|---|---|
 |
 |
Supported documents and formats
The Gemalto Document Reader AT10K reads a wide-range of documents and formats:
- Supported documents include passports, visas, ID cards and all other ICAO-standard travel documents, as well as many non-ICAO variations
- Optional Integrated ePassport (RFID chip) reader so kiosk can read the Machine Readable Zone (MRZ) and smartcard chip in one operation.
- Contactless IC reading for ePassports (LDS 1.7 & 1.8) including basic access control (BAC), passive/active authentication (PA/AA), Chip Authentication (CA), Terminal Authentication (TA), extended access control (EAC v1/v2), supplementary access control (SAC) and PACE-CAM are supported. The SDK provides writing capability using APDUs
- Contactless IC reading for eDL & iDL (electronic driving licenses) up to DG14 including basic access control (BAP v1), Password Authenticated Connection Establishment (PACE), passive/active authentication (PA/AA), Chip Authentication (CA), Terminal Authentication (TA), supplementary access control (SAC) and extended access control (EAC v1) are supported
- Reads 1D and 2D barcodes (PDF417, Aztec, QR® codes and Data MatrixTM), SDK includes an AAMVA decoder
- Reads home print and mobile (cell) phone boarding passes (BCBP) and 1D/2D barcodes.
- Data capture from HRZ and non-ICAO documents (optional software package)
- Enhanced document detection and authentication software (optional software package)
Imaging features
The Gemalto Document Reader AT10K family has the following imaging features:
- True-color and anti-glare technologies deliver accurate, color calibrated images while minimizing interference from document laminate reflections, optically-variable security features or ambient light
- Multiple light sources for image capture and authentication – visible (RGB), infra-red (B900 band IR), ultra-violet (UV-A 365nm)
- Captures full-color or grey-scale images (370 and 700 DPI camera options)
- Flexible software interface (Gemalto Document Reader SDK) allows host application to select which illumination sources to use, image type, image compression, ePassport LDS data and validation, photo extraction, etc.
Physical design features
The Gemalto Document Reader AT10K family has the following physical design features:
- A progress bar with Tick / Cross indicators make reading a document intuitive, helping to direct the user during a read and visually show the result of the read.
- Unique document spine hold down clip, holds down new books and works on multiple, stapled books.
- “No clip” document hood may be removed if desired. The reader is capable of hoodless operation in most brightly-lit indoor environments.
- Simple, intuitive and quick operation that accepts documents in any orientation
- Small footprint, no motorized parts, robust construction.
- Supports left or right, single-handed and gloved operation.
- Provides two USB2.0 ports for attaching additional biometric devices like a webcam or fingerprint reader.
- Powered from a single USB 2.0 port. An optional external power supply is available to support externally attached modules (e.g. magnetic stripe or contact smartcard reader) or USB peripherals.
Common applications
Typical uses of the Gemalto Document Reader AT10K include:
- Border control eDocument data capture
- ePassport and other travel document reading and document verification/authentication
- Airline check-in and bag-drop
- Boarding checks including reading boarding passes including from cellphones and home-print
- Electronic manifests with traveler photo images for API data collection by airlines, cruise lines and ferries
- Hotel check-in and reporting and to meet government regulation
- ID checks for residency, right to work, employee on-boarding, right to rent and money laundering regulations in banks, real estate agents, recruitment consultants, etc.
Car rental ID checks on driving licenses (requires additional software module for non-AAMVA barcoded documents) - Scanning full-color or grey-scale images of travel documents
- Travel document quality assurance during document issuance
Security features
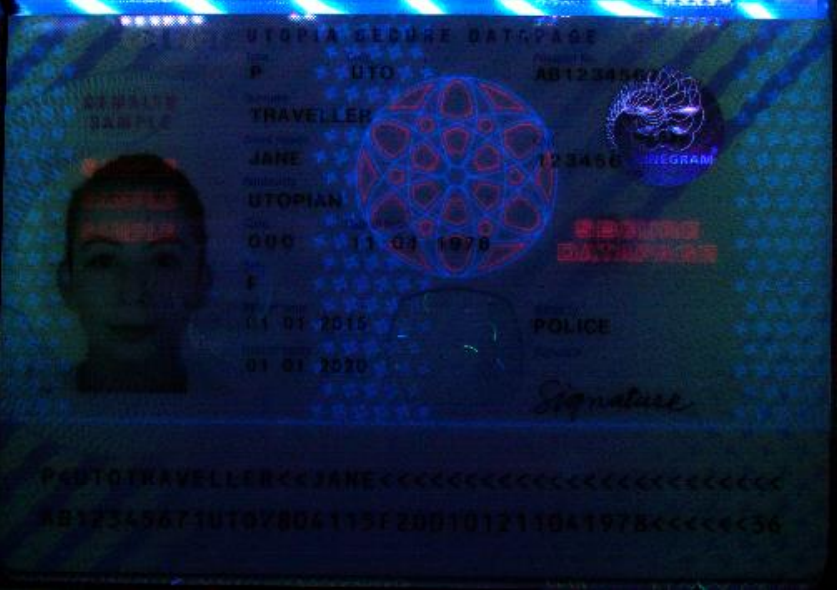
The Gemalto Document Reader AT10K can help authentication software detect forged or counterfeit documents. Using Infra-Red light reveals security patterns and features such as Anti-Stokes inks and can highlight some MRZ substitutions.
Reading the UV features printed in fluorescent inks on a document provides identity verification software with color images of covert document security features.
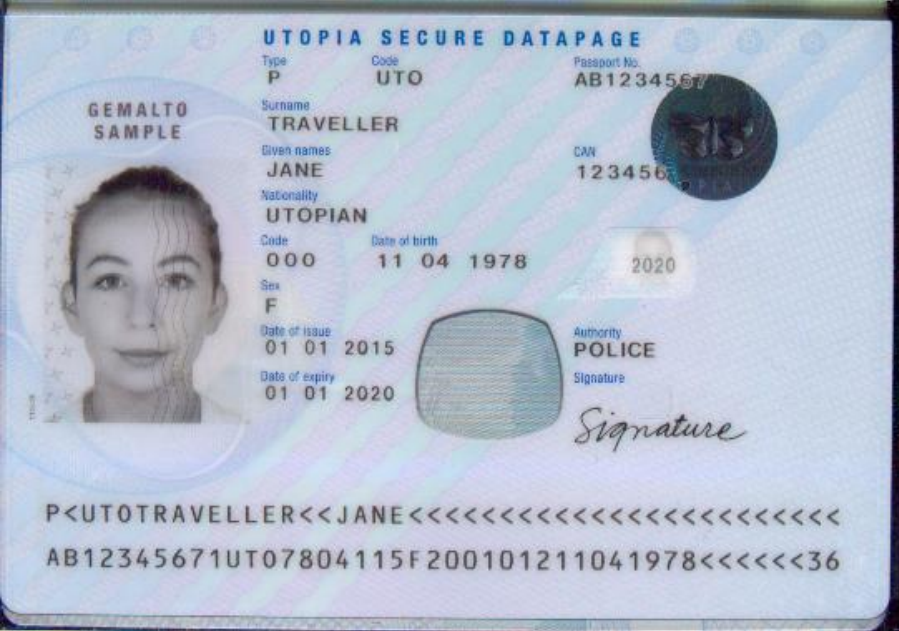
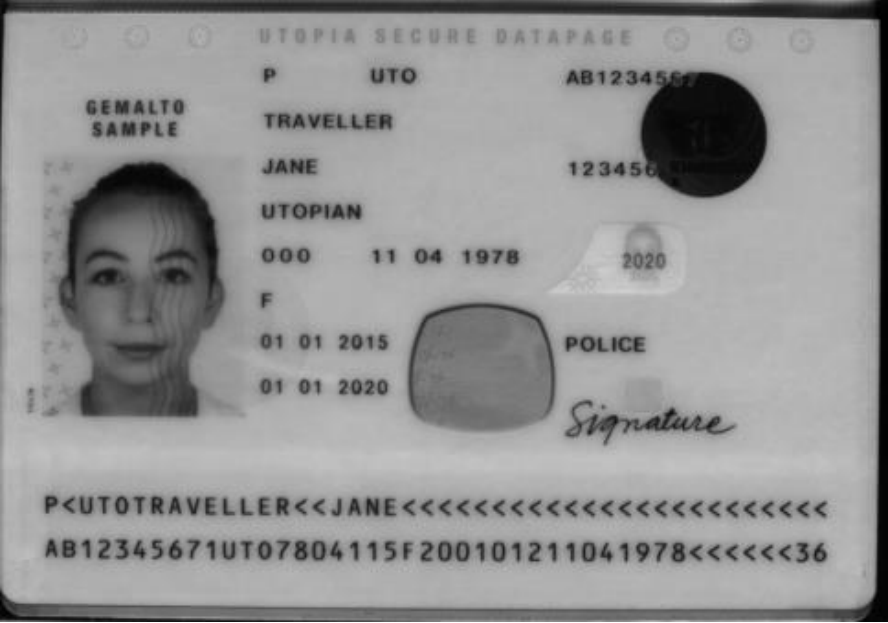
The following images show the different light sources supported by the document reader.
| Visible Light | Infrared Light | UV Light |
|---|---|---|
 |
 |
 |
True-color/Anti-glare Technologies
Anti-glare technology, ambient light compensation and true color imaging ensure that the Gemalto OEM Document Reader AT10K will deliver superior, accurate images of challenging documents in demanding conditions, including those with holographic laminates. Studies have shown that reproducible colors and contrast are important for document authentication and Gemalto Document Readers are both flat field corrected and have color calibration. Ambient light removal enables the capture of high quality images, including UV, without a hood.
| Without Anti-Glare Technology | With Anti-Glare Technology |
 |
 |
| Overhead Ambient Lighting | Ambient Light Removed |
|---|---|
 |
 |
Reader components
The Gemalto Document Reader AT10K is a small desktop device with:
- A document window / plate for placement of documents to be read
- LEDs to indicate document reading status
- A back panel containing communication, USB hub, and power connection ports
- Removable document hood and adjustable clip to allow for scanning of oversized documents
- Optional 5 volt power supply
- Attachment points for mounting the reader to a table or swing arm, etc.
Depending on your model, various configurations or components may be available.
Document window
The document window is a glass surface measuring 125 x 88 mm located on top of the reader. Users place documents on the document window, imaging side down, and slide them to the back of the document window to scan them. The document window is slightly larger than ICAO 9303 requirements to accommodate oversized documents.
The reader has document alignment guides on the left and rear and the user is advised to push the document squarely into the far left corner for the most consistent reading results. Alternative alignment guide formats, including without guides, are available on request.

Keep this surface clean to ensure optimum operation of the reader. See “Cleaning the reader”
Back panel
The back panel features the USB host communication port, 2 USB ports for peripherals, a power supply connector and a power switch. The Kensington® Security Slot can be used to tether the reader to the workspace.
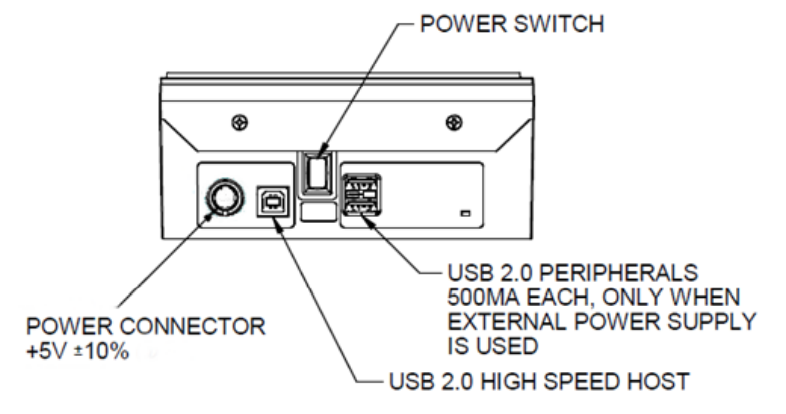
USB Ports
Communication to and from the host PC is via USB 2.0. The USB host interface is a standard Type B connector. A built-in USB hub and two auxiliary USB 2.0 Type A connectors allow you to connect additional USB peripherals such as a mouse, keyboard, printer, etc. The two USB peripheral connectors are capable of supplying +5V DC (500mA) to the peripherals (e.g. 500mA to each peripheral) when the reader is powered from an external power supply.
Power Switch
The power switch is a latching rocker type. Pushing the power switch to the On position allows the reader power to be locked On for Kiosk applications.
Power Supply
A power supply is included with each Gemalto Document Reader AT10K which is Underwriters Laboratory (UL)-Listed and capable of providing +5V DC at 3A. The reader is capable of operating on USB 2.0 power. However, when operating on USB power, due to the limited power available over the USB interface:
- the reader's speed will be slightly slower than when powered from the external power supply
- the back panel USB peripheral ports will not be available.
- Linux and macOS operating systems is not supported
Gemalto recommends the use of the supplied power supply for best performance
To reduce the risk associated with hazardous voltage which, if not avoided, could result in death or serious injury:
- Do not use the reader with any AC power supply other than the provided Gemalto AC power supply.
- Do not use AC power supply and/or power cord if damaged.
- Do not open the reader and/or power supply. Reader is to be serviced by trained personnel only. No user serviceable parts or adjustments inside.
- Do not modify or attempt to modify the reader and/or AC power supply.
- Use only in an indoor dry location. Do not use the product in an outdoor and/or wet environment.
Status Indicator LEDs
The status LEDs are designed to make the reading process more intuitive both for untrained or infrequent users and regular users. The LEDs indicate the reader’s status and the progress of the read until the point when the document can be removed from the reader. These LED sequences have been designed to help users place documents correctly.
During a read the following states can be seen:
| LED Color | Status | Description |
|---|---|---|
| Yellow - Landing Lights | Ready | Reader is ready to scan a document. |
| Yellow - Progress Bar | Busy | Reader is scanning a document and processing the data. |
| Green Check | Success | A known document type was presented and processing was successful. |
| Red Cross | Failure | Document is of an unknown type or did not process properly. |
The LEDs are also used to indicate self-test states during power up as follows:
| LED Color | Description |
|---|---|
| All LEDs Off | Hardware failure, contact IDScan.net Technical Support if problem persists. |
| Red Cross Flashing | Self-test failure, error can be determined from flash sequence, contact IDScan.net Technical Support if problem persists. |
| Red Cross On | Self-test failure, contact IDScan.net Technical Support if problem persists. |
| 2 Yellow LEDs Blinking | Device preparing for operation. |
| Red Cross Slow Flash | Power up sequence failed to finish, contact IDScan.net Technical Support if problem persists. |
| Green Tick Flashing | USB cable is not connected and optional power supply is in use. |
| Yellow - Landing Lights | Reader has powered up correctly, is connected to the host application and is ready to scan a document. |
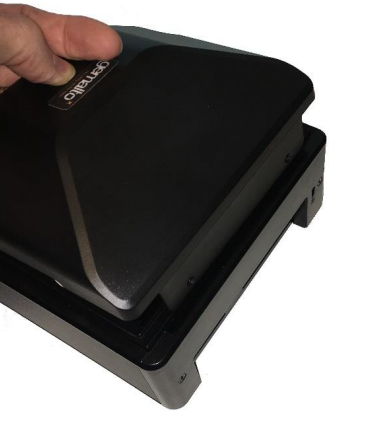
Document hood
The Gemalto Document Reader AT10K features a semi-enclosed hood that minimizes ambient light to ensure high-quality scans, especially in ultra-violet. The hood can easily be removed if the user needs to scan an extra thick document, or if the user finds it more convenient to use the reader this way. The hood can be simply lifted off and slots back into place.
The Gemalto Document Reader AT10K can compensate for ambient light in most bright office environments and will work without the hood attached.
Note that the hood can be fixed by using the glass mounting holes. Contact IDScan.net Technical Support for more information.
Installing the Reader
This section explains how to install the Gemalto Document Reader AT10K software and connect the reader to the PC.
Before you begin
Before you install the reader, you need to meet the following requirements:
- A PC with an USB 2.0 port (the reader will not work if connected to a USB 1.1 port)
- A PC running 32 or 64 bit versions of Windows® 7, Windows® 8.1, Windows® 10, or Windows® 11
- Administrative rights to install the software.
If you are installing multiple readers with the RFID option, ensure a minimum of 25 cm (10 inches) between readers to prevent potential interference.
Unpack the Reader
Each reader package consists of:
- Gemalto OEM Document Reader AT10K
- Power supply unit (PSU) and AC cable
- Test card
- USB communication cable
- Micro fiber cloth
- Software download instructions
To unpack the reader:
- Remove the contents from the box and separate the components from the packing material.
- Verify that all the parts described have been received. If any parts are missing, contact IDScan.net
- Keep and store the original packaging in the event that the reader requires shipment back to Gemalto for maintenance.
Note: If the reader has been stored in a cold environment (i.e. below room temperature), allow the reader warm up for a minimum two hours before powering it on.
DO NOT connect the reader to the computer until you have installed the software. See “Install the Software” section below.
Install the software
The reader package contains an instruction sheet with links to a customer portal to download the software components and documentation necessary to install and operate the reader:
- Gemalto Document Reader SDK
- Reader and software documentation
- Required drivers
- Additional SDKs based on the reader model
To install the reader software:
- Download the latest Image Reader Driver from our website.
- Run the downloaded .exe file and follow the on screen instructions.
Connect the reader cables
Note: Make sure you install the software before connecting the reader.
To install the reader, you need to connect the following cables:
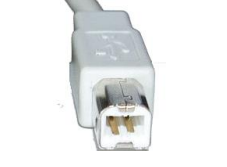
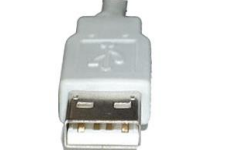
- USB cable – The reader is supplied with a USB 2.0 cable (Type A to Type B).
The cable provides both power and data connectivity to the reader.
| Type B (connects to reader) | Type A (connects to PC) |
|---|---|
 |
 |
- Power supply (optional) – You need to use the optional power supply (PSU) if you want to use the reader as a powered USB2.0 hub or if your PC does not provide adequate power over your USB port. The Power connector is a latching type that cannot accidentally detach as the reader is moved about. To remove the connector, grasp the connector shell and pull away from the reader.
To connect the reader cables:
Note: Use on the USB cable and optional PSU provided with the reader.
Modifications or changes to the Product, the interface cables or the power supply not expressly approved by the manufacturer could void the User's authority to operate the Product and/or break local laws or regulations.
To reduce the risk associated with hazardous voltage which, if not avoided, could result in death or serious injury:
Do not use the reader with any AC power supply other than the provided Gemalto AC power supply.
- Connect the USB cable:
- Insert the Type B connector into the USB port located on the back of the reader.
- Insert the Type A connector into a USB port on the host PC.
- If you want to attach peripheral USB devices to the reader, you will need to connect the power supply (if you are using the reader as-is, you can skip this step). To connect the power supply:
- Connect the connector from the power supply to the power connector at the rear of the reader. Do not force. There is only one orientation that will allow the cable to be connected to the power port.
- Connect the AC cable to a functioning power outlet.
- Turn the reader on using the rocker switch.
- A power-on self-test occurs automatically during power up. If the reader is installed correctly and is operational, the indicator light should illuminate the green tick. If another LED shows then consult page 14 on LED status.
Test the reader installation
After installing the reader, perform a quick test to ensure the reader is functioning properly and the software was installed correctly.
To test the reader:
- Ensure your reader is plugged in to your PC and on after completing the above installation steps.
- Start either VeriScan or WizzForms
- Select your reader in the dropdown menu under Page Reader Settings
VeriScan Plus WizzForms Plus Scanners / Images > Page Reader Settings Image Scanning > Page Reader Settings 
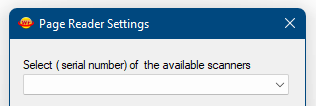
- Click the OK button.
- Verify that the yellow LEDs are in landing lights sequence. The reader is ready to accept documents.
- Place an ID or Passport on the glass tray:
- ID or Driver's License - ensure the barcode is facing down.
- Passport / Passport Card - ensure the MRZ is facing down.
- Push the card to the back of the document window until it stops.
- Note: Do not move the document during the scanning process.
- Observe the lights during the scanning procedure.
- The yellow LEDS change from landing lights sequence to progress bar sequence while the reader scans and processes the data. Ensure that the document is held still whilst reading.
- The OK light (green tick) turns on, indicating a successful read.
- The yellow LEDs return to landing lights sequence, indicating that the reader is ready to scan another document.
The data from the test card is sent to the host computer and the results displayed on the PC screen. If the test is successful, a screen similar to the following screen is displayed.
Reading Documents
This section describes the proper document placement for travel documents:
- Hold the document face down. Note:
- For passports and booklet-style documents, open the document and ensure the data page is facing towards the reader and downwards.
- For boarding passes, make sure its barcode is oriented towards the reader. Place the document over the glass window, do not move or hover it.
- For mobile devices ensure the screen is on and place the screen down over the glass window, holding it still for approx. 2 seconds or until the user LEDS indicate the device can be removed. Some devices require the screen brightness to be turned high. The device can be held up to 1cm from the glass. With tablets ensure that the barcode is over the glass window.
- Place the document on the glass document window.
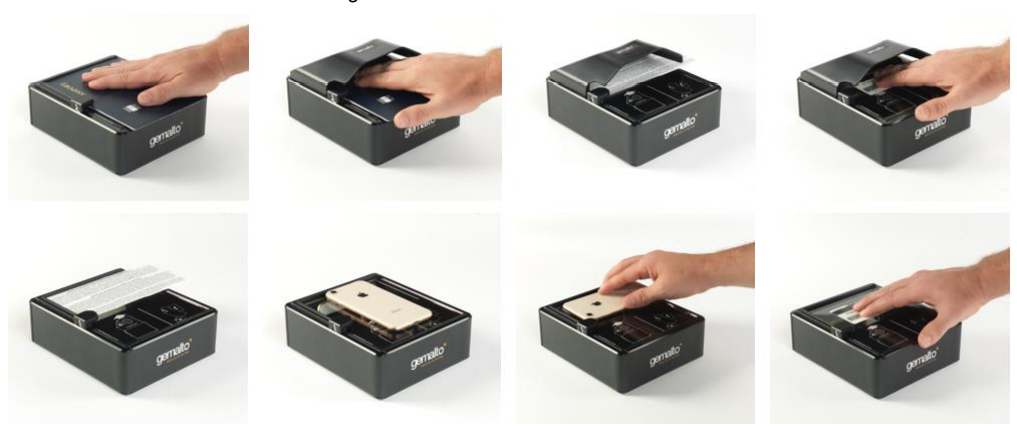
- Push the document until the leading edge is all the way to the back, far left corner. When the document reaches its proper position, the reader will automatically start scanning the document.
- Note: Make sure the document lies flat against the document window and held still during reading.
- Observe the indicator lights during the scanning procedure:
- The yellow LEDS change from landing lights sequence to progress bar sequence while the reader scans and processes the data. Ensure that the document is held still whilst reading.
- The OK light (green tick) turns on, indicating a successful read.
- The yellow LEDs return to landing lights sequence, indicating that the reader is ready to scan another document.
- Watch the kiosk screen to ensure the document passes inspection.
- Remove the document.
Reading RFID documents
When equipped with the RFID option the reader will detect the presence of a contactless RFID chip and will read the contactless data. Reading RFID data takes place at the same time as optical imaging, so the document reading procedure is identical to the procedure described above but depending on the document may take typically 4 to 12 seconds, the yellow progress bar LEDs turning off will show when the document can be removed.
Maintenance
The Gemalto Document Reader AT10K has no user-serviceable parts but its glass surface must be cleaned on a regular basis. For extensive repairs, return the reader to Gemalto service depot.
Cleaning the reader
Clean the reader regularly to ensure proper performance.
Use a safe cloth that will not damage glass, such as the provided Microfiber Cleaning Cloth. To reorder cleaning cloths, contact your sales representative. Do not use abrasive cleaners or solvents. These may scratch the glass or damage the oleophobic coating.
To clean the reader:
- Power off the reader using the power switch on the back panel.
- Clean the document window with a clean microfibre cloth. For stubborn dirt, use a mild water based glass cleaner suitable for touchscreen displays on a lightly dampened microfibre cloth.
- Verify that there are no streaks or smudge spots remaining on the document window.
- Clean the body of the reader with a microfibre cloth which has been lightly dampened with water.
- Turn on the reader by quickly pressing the power switch.
- Verify that the power-up self test performs correctly.
Replacing the document glass
IDScan.net can replace the glass in the document window if it becomes damaged for a fee.
Only an authorized, trained technician should perform this procedure. Failure to correctly follow the instructions could result in injury or cause damage to the equipment. Readers with broken glass should be sent to a repair centre for cleaning and safe disposal of the broken glass pieces.
To replace the document window glass:
- Take a moment to review our Out-Of-Warranty Repair Policy
- Glass replacement is not covered by the warranty.
- This repair will include an inspection fee and a replacement fee.
- Repair is subject to inspection by an IDScan.net Technician.
- Fill out the POST-WARRANTY HARDWARE REPAIRS form on our website.
1. Include your first and last name.
2.Include your email address and phone number.
3.Select your device from the dropdown.
4. Include the serial number of your device(s).
5. Include the invoice / order number of your purchase. (optional - expedites RMA process)
6. In the description, include:
"AT10K glass replacement"
- A support ticket will be created for you - a confirmation email will be sent to your email address.
- An IDScan.net Technician will reach out shortly to facilitate the repair for you.
- The technician may ask for pictures of or ask questions about your device(s)
- Once approved, you will receive shipping instructions for the RMA. Our technicians will work with you throughout the repair process so you can stay informed on your device's progress.
Specifications
* Testing in progress
Troubleshooting
Use the following table to identify and correct common issues encountered when using the reader.
| LEDs do not come on during power up | There is no power to the reader | Verify the reader is connected to a USB 2.0 host port and/or external power supply. |
| The reader is damaged. |
Follow the procedure outlined in “Returning the reader for maintenance”. |
|
|
The power switch is in the Off position. |
Turn the reader on. |
|
|
Red Cross Flashing or Solid |
The reader has failed self-test or is damaged. | Disconnect all cables and turn off. Plug in the PSU cable and turn on. Once successfully powered up then connect the USB cable. If this procedure does not clear the error then follow the procedure outlined in “Returning the reader for maintenance”. |
| Green Check Flashing | USB cable is not connected | Check USB cable is connected at both ends. Check USB cable is not damaged. Check PC USB port is not damaged or disabled. |
| The reader is not communicating with host PC system. | USB cable is not properly connected | Verify that the USB cable is connected to the host. |
| USB drivers are not properly installed | Verify that the USB driver is installed. |
|
| Multiple instances are running | Verify that only one reader is connected to the host system and only one instance of the host application is running. |
|
| The Red cross LED illuminates when a document is scanned | The document is non-machine readable. | This is a normal condition when there is no machine readable data and only the image is captured from the document. |
| The document is poorly printed or does not conform to specification. | The reader is designed to read documents that are poorly printed. However, some documents are of such poor quality that the reader will not be able to process the OCR data. Verify the document conforms to ICAO 9303 or OCR B font requirements |
|
| High ambient light. | Re-orient the reader so that bright light does not fall directly on the document window. | |
| The unit is not configured to read the document being scanned. | Verify the reader configuration with technical staff. Contact IDScan.net Technical Support. |
|
| The document is not orientated correctly on the scanning window. | For details on document placement, see the Reading Documents section above. |
|
| The scanning application is not working. | The application may already be running. | Verify that only one copy of the application is running. |
| The software is installed incorrectly. | Remove the existing application & re-install software. For more information see the Software Installation section. |
|
| Another application is already running | Check that there are no other running applications or services that have connected to the reader. Close or disable any applications or services that are found and retest using the Gemalto demo application. |
|
| You do not have Administrative rights. | Consult with your IT Department. |
|
|
LEDs do not change after reading an RF chip |
Nothing | This is a normal condition. RF status is displayed only on the host screen. |
| Reader becomes unresponsive |
Close and restart the application. Disconnect USB and PSU from PC and then reconnect. Disconnect USB and PSU. Close application and then restart PC. Reconnect document reader to PC and then open application. Contact IDScan.net Technical Support if still unresponsive |
|
| USB peripherals attached to the reader do not power on or do not function correctly | You need to use the external power supply when attaching external devices |
Verify the AC power source. Verify that the AC cable is connected to the AC power source. Verify that the power cable is connected to the power supply port located on the back panel |
| Symptom | Possible Cause | Recommended Actions |
|---|
Customer Service
If you cannot solve the problem after following the instructions in the Troubleshooting section, contact the IDScan.net Technical Support team for further assistance.
Before contacting technical support:
Be prepared to provide the information required to properly diagnose the problem:
- A detailed description of the problem
- A detailed description of the actions taken to correct the problem
- The serial number of the reader (located on the reader’s bottom panel)
- The order number or invoice number of the purchase of the reader
Contacting IDScan.net
Once you have the above information, contact the IDScan.net Technical Support team.