Table of Contents
Choose how devices access scan history
Control access by enabling admin/security lock
Choose how devices handle being disconnected from the internet
Overview
Admins often need to restrict the actions that end users can take in software to ensure security, stability, compliance, and overall efficacy of the system. VeriScan is no exception. While most settings are centralized in the VeriScan Cloud portal, there are a number of opportunities for users to take actions or view data from the VeriScan for Windows application, and we are committed to giving admins full control so they can ensure a uniform experience for staff and visitors.
Choose how devices access scan history
Per device
When you add a device in Access Management > Devices, you have some options that will apply to VeriScan for Android, iOS, as well as Windows:
- View Scans from All Devices - if this is enabled, the History tab in VeriScan for Windows will display the last two months of history from all devices connected to this account, even those at another location.
- View Only - if this is enabled, end users will not be able to add or update email, phone number, visit comment, group, or group comment.

After a device has been added, you can change click the Edit button to update these options.
System-wide
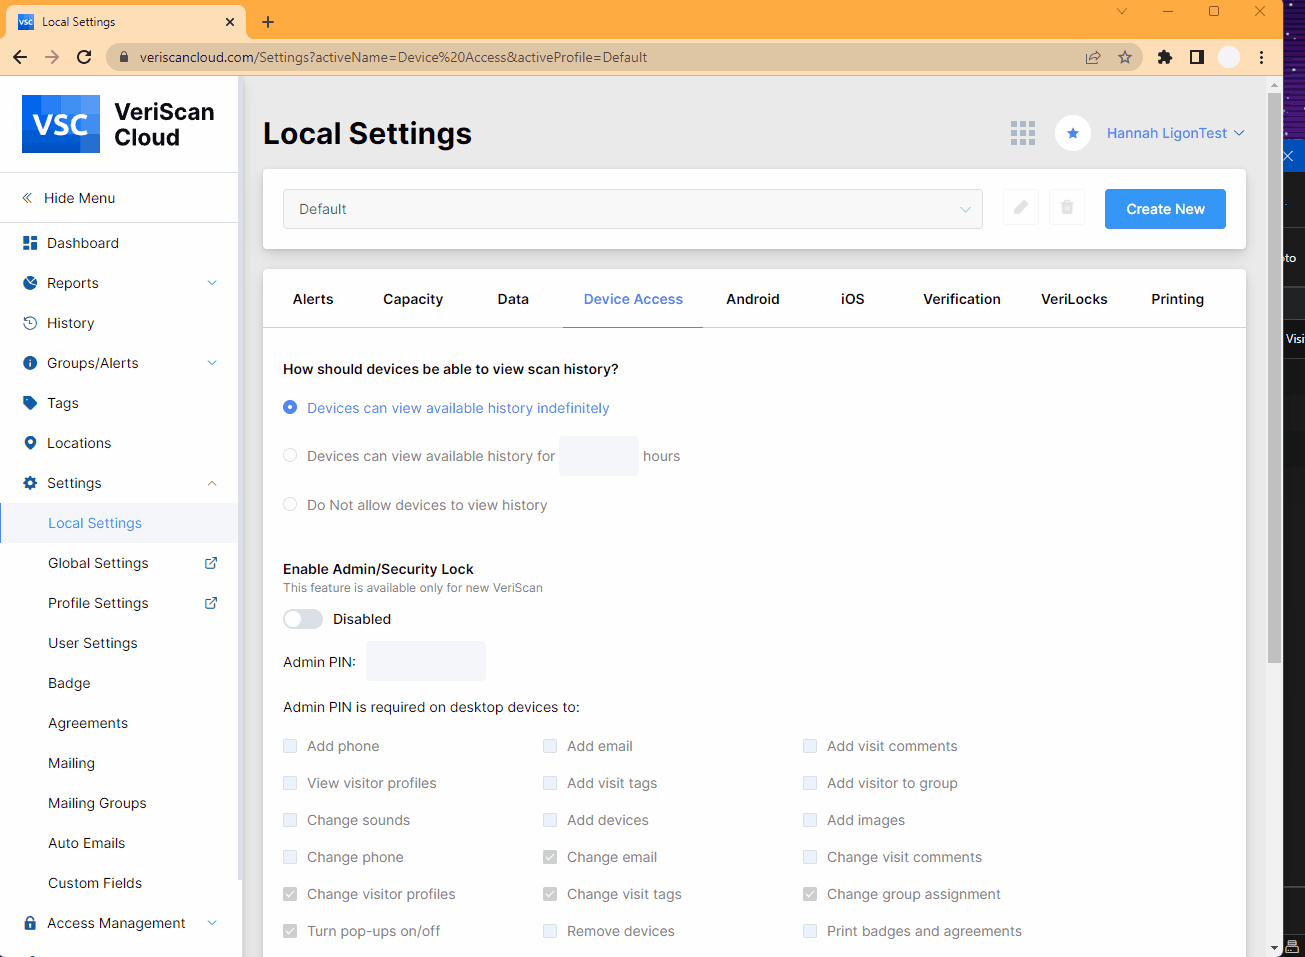
If you want to handle device access to scan history for all your connected devices in one place, you can do that in Settings > Local Settings > Device Access.
You have 3 options to determine how devices should be able to view scan history:
- Devices can view available history indefinitely
- Devices can view available history for your choice of 1-200 hours
- Do not allow devices to view history
Control access by enabling admin/security lock
There are a number of other actions staff using VeriScan for Windows can take, and you might need to curb those actions or require escalation to a manager. In Settings > Local Settings > Device Access, you can enable the Admin/Security Lock, assign a PIN, and choose which actions require that PIN by checking the box next to them. Learn more about what each of the actions are here.
Once enabled, in VeriScan for Windows, click the lock in the lower left corner of VeriScan and enter the Admin PIN to unlock. When you're finished, simply click the button again to lock it back.
You may need to close and re-open VeriScan for Windows for security mode to take effect once it is enabled in VeriScan Cloud.
Choose how devices handle being disconnected from the internet
VeriScan is designed to be used with an active internet connection, since all scans are saved to the cloud. However, we know there are times when you may need to continue scanning even though you have temporarily lost access to the internet, so this flexibility is built into VeriScan.
You can choose what happens when devices are disconnected from the internet from the following options in Settings > Local Settings > Device Access:
- Allow scanning with temporary local storage and re-sync on internet restoration for your choice of 1-14 days
- Do not allow scanning
Scanning in offline mode does not give the best results for fake ID detection, up-to-date group assignments from other devices, or alert lists, so it is not advised to operate regularly in offline mode if you use these features. Re-sync can take some time to complete, so we recommend limiting the number of days it is permitted.