TABLE OF CONTENTS
Introduction
In this knowledge base article, we will cover how to get started with the VeriScan Cloud application for Android, including initial setup, how to scan, access history, explore customization settings, and more. If you have any questions during about the app, feel free to contact support.
Requirements
VeriScan Cloud Account
Using VeriScan on your Android device requires a VeriScan Cloud account. If you don't already have an account, you can follow this guide on our knowledge base:
Creating a VeriScan Cloud Account ![]()
You will receive your device credentials via email when you sign up for an account. Additional devices can be added on Premium and Enterprise subscriptions, and you can manage your devices on the VeriScan Cloud Portal under Access Management > Devices.
Supported Laser Scanners
Direct laser scanning is available for the following devices:
- TOUGHBOOK FZ-N1 by Panasonic
- Unitech PA768, EA630, PA730
- IDW9000 Plus, IDWare 9000
- IDWare Falcon Tablet
- Zebra TC21, Zebra TC52
Other Compatible Hardware
Other Android devices can run the VeriScan app using camera scan. Other built-in laser scanners may not be compatible with the VeriScan app and may require using the camera to scan.
System requirements:
- OS: Android 5.0 or greater
- Camera: 12MP Rear Camera
- Connectivity: WiFi or SIM compatibility for internet access
- Memory: 4GB Ram
- Display Resolution: 1080p Resolution
- USB: OTG Mode Support (for use with E-Seek M260)
Getting Started
You can download the VeriScan app from the Google Play Store. Once downloaded, you can sign in with your Device Credentials. Once you are signed in, you can start scanning.
For a step-by-step guide on getting set up, you can follow the VeriScan for Android Setup Guide.
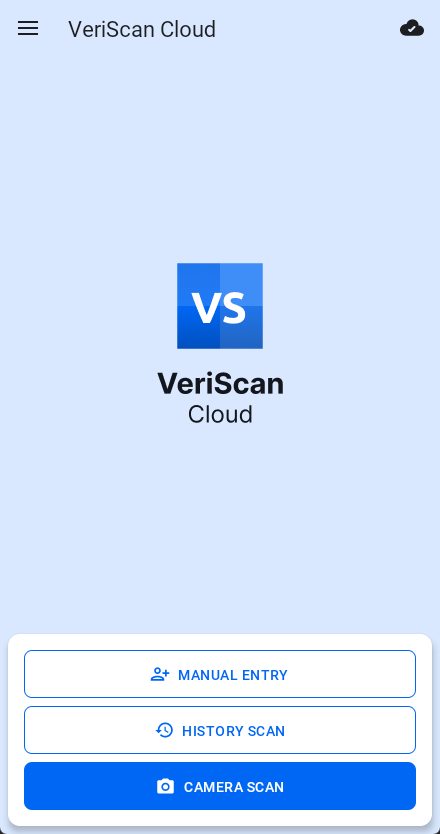
Once logged in, you can see the main menu with a few options:
|
3-Line Menu:
Cloud Icon:
Scan History:
Reader Scan:
Manual Entry:
|
 |
Scanning With A Supported Laser Scanner
Each scanner we support has its own set of physical buttons to scan with. Please refer to the images below to properly identify your scanner's scan buttons.
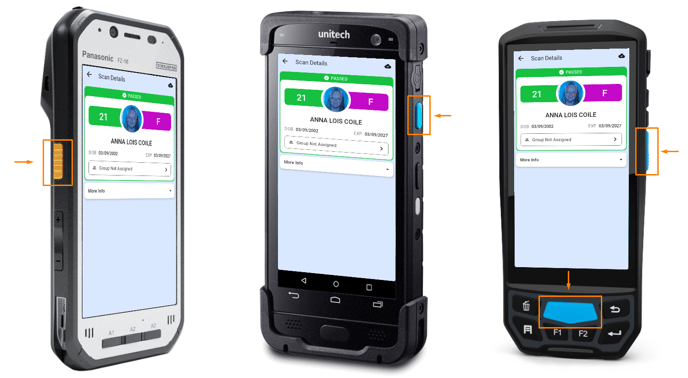
Press and hold one of the scanner buttons on your device and aim the laser at the barcode on the back of an ID.
For best results, hold the ID or passport 6 to 8 inches away from the laser scanner. Use the light and laser guide to align the ID and center the barcode with the laser.
You will hear a beep upon successful scan.
Scanning with the Camera
If you don't have a dedicated scanner, you can use the camera on your Android device.
| Tap on the Scan ID button on the app home screen to open up the camera. You may see a pop-up for permission to allow access to the camera. |  |
Ensure the ID you're scanning is in frame. Once the camera has focused, a yellow rectangle followed by a green one will appear over the barcode.
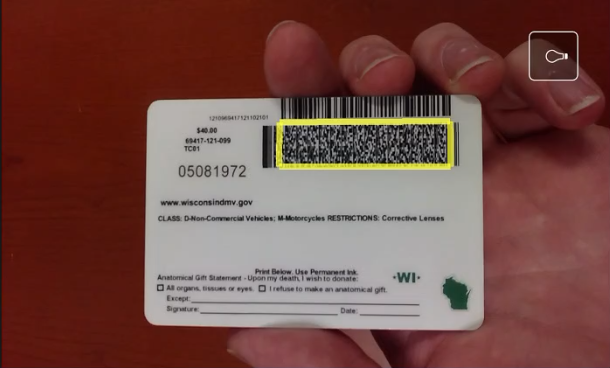
The application will beep upon successful scan and take you to the scan results screen.
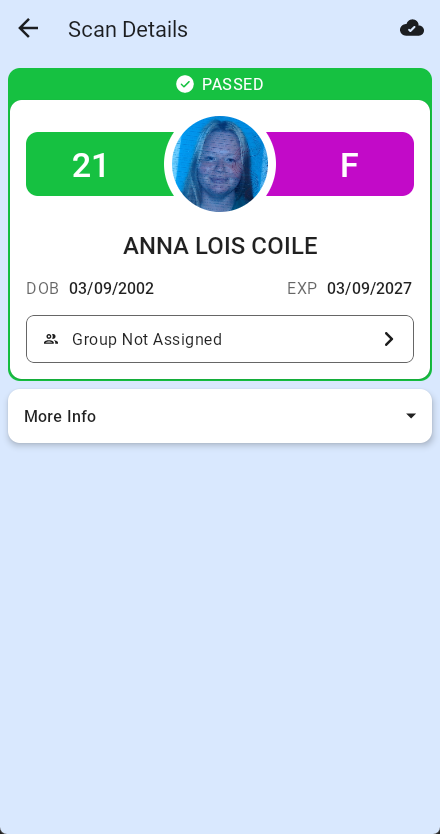
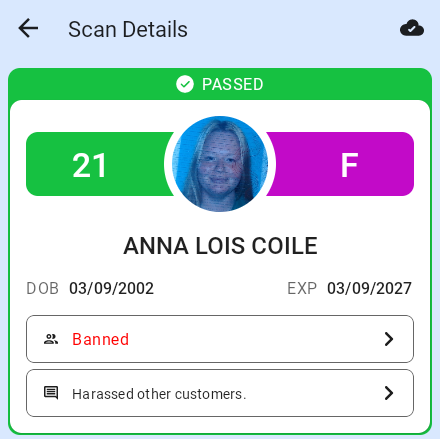
Scan Results Screen
After a scan, you will see a profile of the ID with relevant information about the visitor.
|
Visitor Info: Shows relevant information about the visitor at a glance, such as:
Button Panel: Shows additional actions and menus related to this visitor, such as:
|
 |
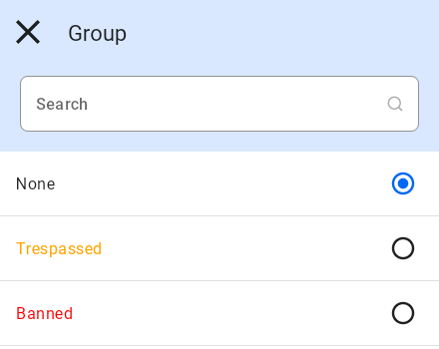
Assigning a Group
Groups are a good way to quickly categorize a visitor for repeat visits.
Remember: A customer can only be in 1 group at a time.
Simply tap the Group selector and place your visitor into the appropriate group:
Premium and Enterprise customers can customize their groups in the VeriScan Coud portal by navigating to Groups in the sidebar. |
 |
|
 |
Adding a Photo
After the scan of an ID, VeriScan Cloud allows you to capture and assign a photo.
Tap on the "person icon" in the middle of the Age and Gender to bring up the photo options.
You can choose to add a photo From Files (existing photos on your device) or capture a new one using the Camera on your device.
More Info
Tapping on the More Info button allows you to view the Address from the scanned ID (if available). In addition, VeriScan Cloud allows you to capture information not present on an ID. These fields include Phone, E-mail, and Comments.
|
Phone:
Email:
Comments:
Address:
Tags:
|
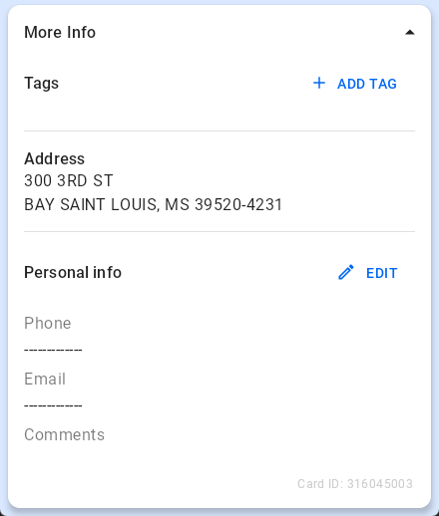 |
You can manually add phone, email, and comment information by tapping the blue Pencil Icon.
You can also add or remove tags by tapping the blue Plus Icon.
Manual Entry
| If a visitor does not have their ID on them, but you want to enter them into the VeriScan Cloud history anyway, use the Manual Entry button to type out their information. |  |
![]()
Make sure to fill out all of the required fields to enter the visitor's information manually.
Offline Scanning
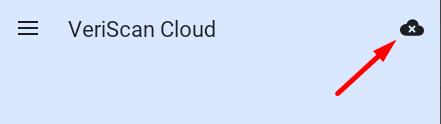
The VeriScan app allows you to scan while not connetced to the internet.
VeriScan can only scan offline for a period of 72 hours or for 5000 scans, whichever comes first. Afterwards, you will be asked to go online to sync your data to the Cloud.
|
Offline mode is signified by a red background and an X-Mark in the cloud icon in the top right of the screen. To force the app online or offline, tap the cloud icon while connected to the internet. |
 |
![]() Going offline and back online is a great way to force synchronize your device with the cloud portal.
Going offline and back online is a great way to force synchronize your device with the cloud portal.
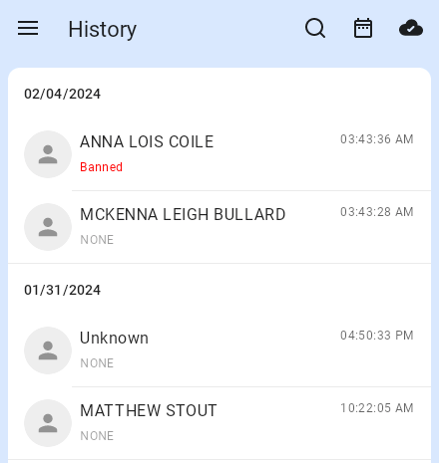
Scan History
|
To view the History of your scans on your device, tap on the Scan History button from the main app page. You can also access the history by tapping the 3-Line Menu icon in the top left of the screen and selecting History from the side menu. |
 |
In the History Screen, you can see a list of all your scans in chronological order.
|
Calendar Icon:
Search Icon:
Visitors List:
|
 |
Settings
|
You can customize and change some functionality of the VeriScan app in the Settings Menu. To get started, tap the 3-Line Menu Icon in the top left and tap Settings. |
 |
Readers
Some of these options will only be available on certain devices.
If pressing the scan buttons on your handheld scanner doesn't trigger the laser, you can try disabling then reenabling the checkbox for the embedded reader on this menu.
 |
E-Seek | Allows you to use USB OTG to connect an E-Seek M260 scanner to your Android device. |
 |
Partner | Enables or disables the built-in scanner on the IDW9000 or IDW9000 Plus. |
|
Panasonic | Enables or disables the built-in scanner on the TOUGHBOOK FZ-N1 by Panasonic. |
|
Unitech | Enables or disables the built-in scanner on the Unitech PA768, EA520, PA760, and EA630. |
|
Zebra | Enables or disables the built-in scanner on the Zebra TC21 and TC52. |
Interface Customization
These options allow you to customize the buttons and layout of the scan results.
| Third-Party Checks Button | Show a button on the Scan Results screen that allows you to run a 3rd party check. |
| Automatic Third-Party Checks | Automatically run all enabled 3rd party checks after each scan without prompting the user. |
| Camera Button | Enable this to show a button that launches the Camera Scanning mode. |
| Agreement Button | Show a button on the Scan Results screen that allows the visitor to read and sign an agreement. |
| Can't Scan ID Button | Show a button in the Camera Scan window if an ID won't scan that opens the Manual Entry screen. |
| Auto Start | Launch the VeriScan app automatically when the device first turns on (you can always exit later). |
Warning Pop-ups
These options allow you to customize which popup alerts appear after a scan.
| Rescan Warning | Shows a popup if a visitor has been scanned more than once in a specified period set by the portal. |
| Group Warning | Shows a popup if the Group a visitor is assigned to is set to show an alert when scanned. |
| Alert List Warning | Shows a popup if the scanned ID matches information set in the Alert List on the portal. |
| Age Warning | Shows a popup if a visitor is under the minimum age specified in the portal. |
| Expiration Warning | Shows a popup if the ID a visitor presents has reached its expiration date. |
| Address Warning | Shows a popup if the scanned ID matches information set in the Address Alert List on the portal. |
| Gold Zip Code | Shows a popup if the visitor's home address is one of the top 100 most wealthy zip codes. |
| Barcode Security Check | Shows a popup if the ID fails the Barcode Security Check and needs further review. |
| Agreement Screen | Automatically show the agreements screen after each scan without the need to press the button. |