
The ParseLink localhost API is only supported on ParseLink version 2.26 or greater.
The ParseLink Windows Service exposes a local HTTPS API (the "LocalHost API") that lets other applications on the same machine integrate with ParseLink - triggering scans, retrieving scan results and images, and checking service status - without needing to interact with the ParseLink desktop UI directly.
The API is self-documented using Swagger (OpenAPI 3.0).
Installation and Licensing
-
Download and install the latest ParseLink installer from our downloads page.
-
Download and install the latest Authentication Host SDK from our downloads page.
- Follow the ParseLink Device Licensing steps to activate your license.
Configuration
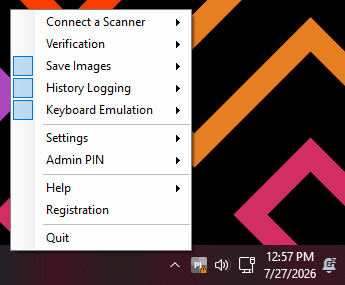
We recommend disabling all non-essential functions of ParseLink for use with the localhost API. This will prevent keyboard emulation and prevent any files from being saved locally on the machine.
Right-click the PL icon in the system tray and uncheck these three checkboxes in the main section of the menu:
|
 |
Enable the Authentication SDK
Ensure the Authentication SDK is installed on your machine before launching ParseLink to enable the Authentication SDK.
|
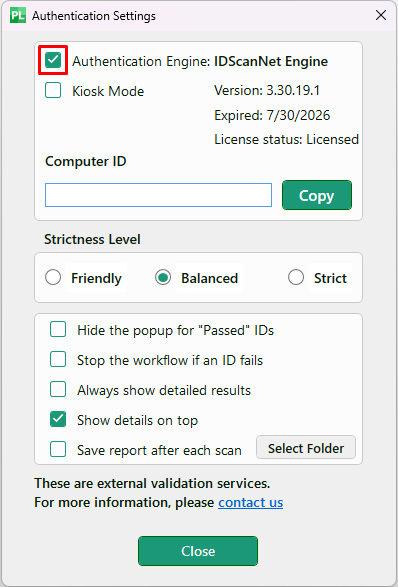
Right-click the PL icon in the system tray and navigate to:
Enable the checkbox for ☑ Authentication Engine. If the checkbox is disabled, try to relaunch ParseLink after the latest Authentication SDK has finished installing and try again.
Optional: Enable the checkbox for ☑ Hide popup for "Passed" IDs to prevent ParseLink from showing a popup if the scan status is Passed to prevent interruptions if needed.
Click the Close button and the Authentication SDK will initialize. |
 |
Enable the LocalHost API
Right click on the ParseLink icon in the system tray and navigate to Settings > LocalHost API
Ensure this checkbox is enabled and the endpoints will be active on localhost:5000
Accessing the Swagger Page
Once ParseLink is running with LocalHost mode enabled, the live, interactive documentation is available at
https://localhost:5000/swagger/index.html
Endpoints
All current endpoints are grouped under the Scanner tag.
| Method | Path | Function |
| GET | /parselink/scan | Triggers the default/active reader to scan, and returns the parsed and authenticated result, including any captured images. |
| GET | /parselink/scan/{ipAddress} | Same as above, but targets a specific reader by IP address - useful for specifying which Digital Check Smart Source Elite scanner to call at scan time. |
| GET | /parselink/state | Returns the current state and version of the ParseLink application and service (e.g., whether it's ready, busy, unlicensed, not configured, or in an error state). |
Data Schemas
The API defines the following schemas (models) for its requests and responses:
-
ScanModel - Represents the result of a scan operation, the primary object returned by the /scan endpoints.
-
AuthenticationModel - Represents the authentication result/details for a single check performed on the scanned document.
-
AuthenticationGroupModel - Groups related authentication checks together, likely used when a scan returns multiple authentication results at once.
-
ImageModel - Represents an image captured during the scan (e.g., front/back of a document, UV image), returned as part of the scan result.
-
StateModel - Represents the service/application state returned by /parselink/state
-
ErrorModel - The standard shape returned when a request fails, so integrators can handle errors consistently.
For the exact fields, types, and nesting of each of these, expand the corresponding schema in the Schemas section at the bottom of the Swagger page - this article intentionally doesn't restate field-by-field detail so it doesn't go stale as the API evolves.