What to do when you receive the error "Program is Already Running"
TABLE OF CONTENTS
Introduction
Most of the time, the reason it is already running is due to the program being launched multiple times.
Simply wait a few seconds after launching and the program will launch. Just ignore any of the messages that do appear, as the program is working as intended.
If you've just installed VeriScan Desktop and it has never launched before, it is possible that it was installed the VeriScan Desktop Service instead of VeriScan Desktop.
It's also possible you clicked the "Install Service" button inside VeriScan Desktop.
For either of these cases, go to the VeriScan Desktop Service area and follow the instructions provided.
Resolution Methods:
If the program still hasn't launched after a few minutes, there is likely an issue.
You can attempt the methods below and contact our support team if you require assistance.
VeriScan Desktop
These tutorials were made using Windows 10+ systems.
While not completely accurate for earlier versions of windows, they should still be helpful.
Forcefully Shutting Down VeriScan Desktop
1. Open Task Manager.If you can't locate the VeriScan.exe process in the following steps, you either haven't run the program yet, or you're actually running the VeriScan Desktop Service.
If you are actually running the VeriScan Desktop Service instead of VeriScan Desktop, you need to uninstall VeriScan Desktop Service.
Ctrl+Alt+Delete Menu.
Search for it through Windows' Search Bar.
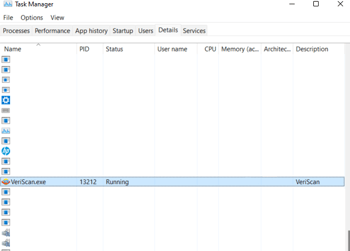
2. Click More Details.
3. Click on the Details tab.
4. Locate VeriScan.exe.
5. Right click it and select End Task or Stop.
Reinstalling VeriScan
1. Open the Settings App by:

Right click on Desktop and Select Personalization or Display Settings.
Search for it through Windows' Search Bar.
Right click Start/Windows Icon, select Settings.
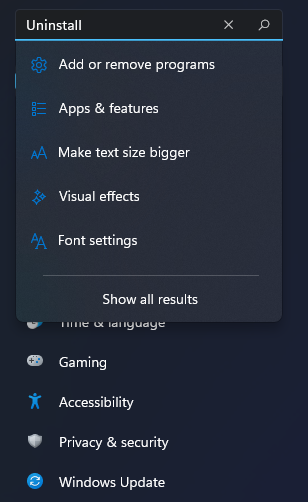
2. Search for "Uninstall".
3. Select "Add or remove programs".
VeriScan
4. Search for VeriScan in the "App list".
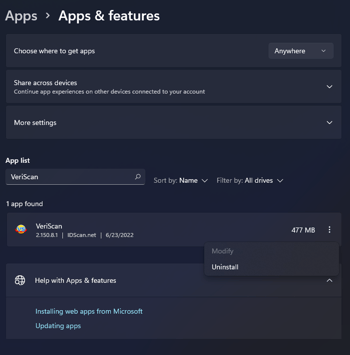
5. Click on the 3 vertical dots next to VeriScan.
6. Click "Uninstall".
7. Click "Uninstall" again in the new drop-down to verify your choice.
8. Download the latest version of VeriScan.
9. Launch the installer.
10. Go through the installer and don't click or change and options unless specified by a support staff.
11. Launch VeriScan.
VeriScan Desktop Service
The VeriScan Desktop Service is made for clients who wish to use VeriScan through other applications.
The Service itself runs just like VeriScan, just without any UI for the user.
If you wish to have UI, you shouldn't install the Desktop Service. You will need to uninstall and reinstall VeriScan Desktop to get the GUI back.
Forcefully Shutting Down VeriScan Desktop Service
1. Open Task Manager.
Ctrl+Alt+Delete Menu.
Search for it through Windows' Search Bar.
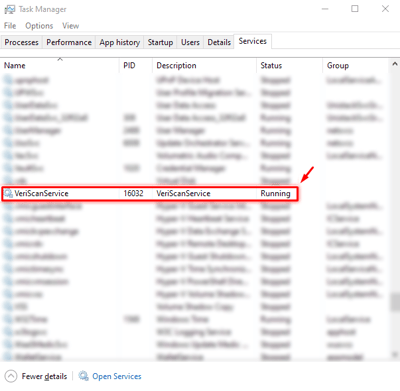
2. Click More Details.
3. Click on the Services tab.
4. Locate VeriScanService.
5. Right click it and select Stop.
Uninstalling VeriScan Desktop Service
1. Open the Settings App
Right click on Desktop and Select Personalization or Display Settings.
Search for it through Windows' Search Bar.
Right click Start/Windows Icon, select Settings.
2. Search for "Uninstall".
3. Select "Add or remove programs".
VeriScan
4. Search for VeriScan in the "App list".
5. Click on the 3 vertical dots next to VeriScan.
6. Click "Uninstall".
7. Click "Uninstall" again in the new drop-down to verify your choice.
8. Download the latest version of VeriScan.
9. Launch the installer.
10. Go through the installer and don't click or change and options unless specified by a support staff.
11. Launch VeriScan.
Avoiding in the Future
To avoid accidentally installing VeriScan Desktop Service, just don't enable the service in the installation or install the service from the Setup tab.