Table of Contents
Introduction
Using the IDScan.net Web Library tool, DIVE Online users can configure the user experience including document type, CSS, and liveness checks.
The changes reflected in these settings will be the same for end users in the submission process.
These configurations can be found on the "UI Customization" page of the web portal.
Profiles
Within the DIVE Online portal, users can create multiple profiles under a single account, allowing them to set and manage different configurations within the same account.

These profiles would then be selected in the Verification Request and would reflect the individual settings set by the user.

Styles
The styles section configures the visual presentation of the Web Library including colors of the component and button radius size.
"Simple mode" is advised for non-developer users and "Pro mode" for developer users.
Users can examine the visual hints in "Simple mode" or comments in "Pro mode" to see which settings change parts of the Web Library.
Example of changing the --color-primary from default to red:
Before


After


Default:
Options
Fix Front Orientation After Upload
Document Types
The document types allow users to choose which documents end users can submit, step configuration, and capture method.
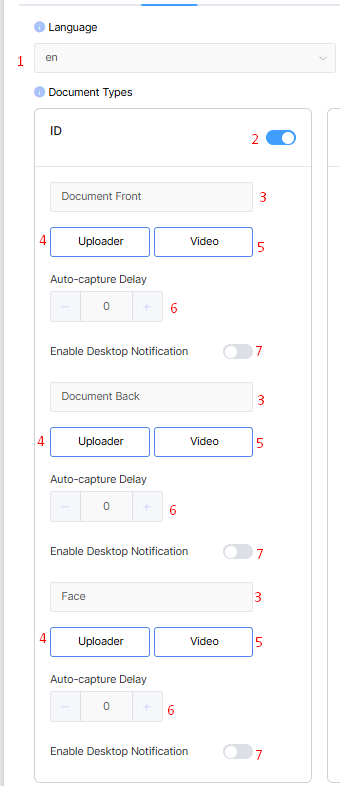
- Language - Changes text to English or Spanish.
Default : en - Document Toggles (ID, Passport, Passport Card, Green Card, International ID) - This enables the document type chosen to be used in the system. Disabling document(s) will prevent end users from submitting them.
Default : Enabled - Document Step Text - Changes the step name text for the end user.
Default : Enabled - Capture Method "Uploader" - Enables file upload from the end user's device.
Default : Enabled - Capture Method "Video" - Enables live video capture from the end user's device.
Default : Enabled - Auto-capture Delay - Value to allow a delay for auto-capture when the camera opens on the end device.
Default : Disabled - Enable Desktop Notification - Enables the appearance of a text box for desktops to prompt end users to scan on a mobile device for camera difficulties.
Default : Disabled
Please reach out to your account manager at IDScan.net if you are interested in International documents.
If the video and uploader are disabled on a step it will be removed from the entire configuration.
Example: Turning off video and uploader on the face step will allow the user to not be presented with the face step.

Real Face Mode
The "Real Face Mode" setting enables the end user to initiate a liveness check if the selfie step is being used for video capture. This checks if the user is active by asking them to turn their head left, right, up, or down.
- All - Enabled on all devices.
- Auto - Enabled on iPhones only.
- None - Disabled on all devices. End users will only need to remain still on video capture.
Default : All
Resize Uploaded Image
This setting sets the maximum amount of pixels of the larger side of manually uploaded images.
Example: 1500 does not allow the greater side of an image to be uploaded past 1500 pixels.
Default : 1400
Submit Button
This enables/disables the submit button entirely.
If the submit button is disabled, the submission will automatically process upon receiving all necessary images.
Enabled (user must click "Submit" to process scan)

Default : Enabled
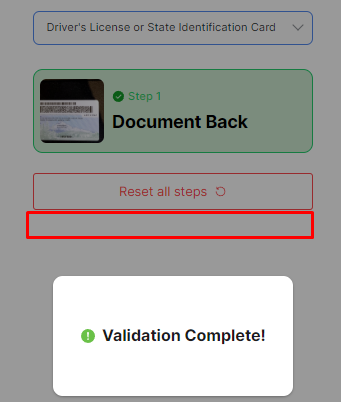
Show Document Type Select
If a DIVE Online user has multiple document types in their configuration, the end user will be prompted initially for document type selection if enabled.
If this setting is disabled, this modal will disappear and default to the first in the list.
In this example, the window would not appear and default on the driver's license configuration.
Users can still change the document type after selecting the button shown below.

Default : Enabled
Use CDN
This loads the Web Library's neural networks from a content delivery network instead of the DIVE Online user's web server if enabled.
It is recommended to leave this setting disabled if the user is unfamiliar with this.
Default: Disabled
Auto Continue
Auto continue allows the workflow to automatically pass to the next step upon providing an image.
If disabled, the user must press the "Continue" button at the bottom of the component to proceed to the next step(s). When enabled, this will be done for them.
Default : Enabled
Allow Submit with Warnings
If enabled, this allows images that give a warning in quality to be submitted. When this is disabled the end user must submit a better image. The document in the image has been hidden for this article.

Fix Front Orientation After Upload
This flag if enabled will make the system auto-correct front step images to be orientated vertically if uploaded horizontally.
Example
Fix Front Orientation Enabled:
Fix Front Orientation Disabled:

Default - Enabled