VeriScan has a number of tools allowing you to organize and label your visitors after you scan their IDs, including groups and tags.
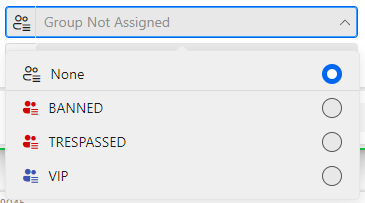
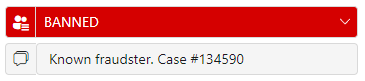
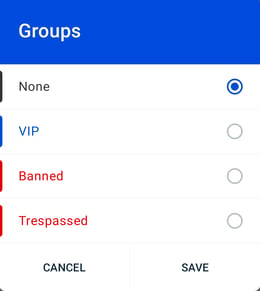
If a visitor is assigned to a group, you will see it immediately after scanning their ID, no matter which app you are using, and a visitor can only be assigned to one group at a time.
A visitor can have multiple tags applied, though it's not always front and center after a scan.
If you need to manage visitors who have not yet been scanned, that's a job for our alert list and access list feature.
Contents
How to assign a visitor to a group or change a visitor's group
Groups
Group creation and options
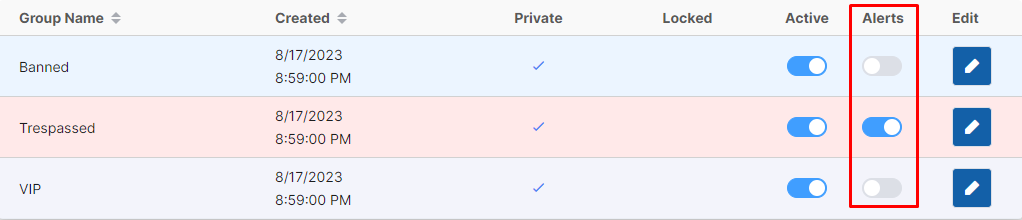
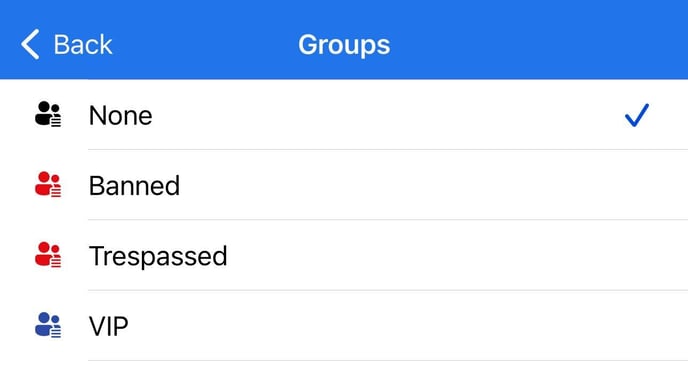
Groups are created and managed in VeriScan Cloud > Groups. By default, your account has three groups: Banned, Trespassed, and VIP, but you can create as many as you need and customize them to your purposes.
To create a new group, click 
To edit an existing group, click 
Group Name: This is the name of the group and will display on assigned person's profiles.
Color: This is the color of the alert message or group label that appears when a person belonging to that group is scanned.
Active: If toggled on, the group appears in the Group dropdown on devices. If toggled off, the group will not appear on the device Group dropdown, and no new visitors can be assigned to the group. Inactive groups' assigned visitors will remain until they are manually removed.
Locked: Once a visitor is assigned to a locked group, only an admin can remove them or change their group assignment from the VeriScan Cloud portal.
Shared Group: Allows groups to be shared across multiple VeriScan Cloud accounts. This requires specific setup. Create a support ticket here for help.
Group alert visible for iOS devices: If toggled off, the group alert will be hidden on iOS devices.
After choosing a name, color, and enabling the appropriate toggles, click OK to create the group.

Alerts toggle: After your group is created, you can toggle its Alerts status on or off. If Alerts is toggled on, anyone added to your Alert List for that group will prompt email and/or SMS notifications when scanned. Learn more about using Alert List here.
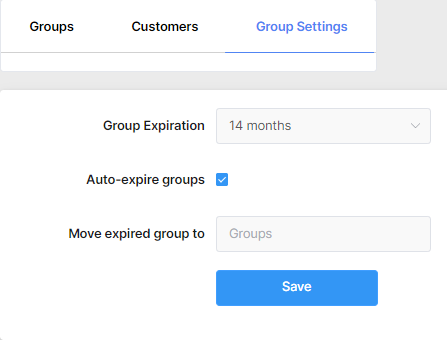
Auto-expire group assignment
Once a visitor has been assigned to a group, you will need to manually remove them from that group by assigning to None.
However, if you need to auto-expire visitor group assignments on a schedule, you can choose the schedule under Groups > Settings.
How to assign a visitor to a group or change a visitor's group
After a visitor is scanned, you can add them to a group either on the device you're using to scan, or in the VeriScan Cloud portal.
| VeriScan for Windows Open the Group dropdown to select the relevant group. You can also add a group comment just under after the group is assigned. Note: you can prevent end users from adding visitors to groups by requiring an admin PIN to unlock this action. |
|
| VeriScan for iOS Tap Group and select the appropriate group. In VeriScan Cloud under Settings > Local Settings > iOS, you can choose whether to prompt when adding a visitor to a group.  |

|
|
VeriScan for Android Tap Group and select the appropriate group. In the app's settings, you can choose whether to prompt when adding a visitor to a group. |

|
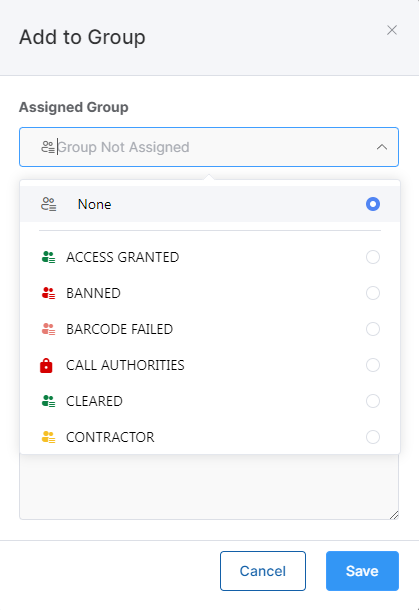
| VeriScan Cloud Portal Portal users with access to the relevant sections can assign or change singular or multiple visitors' groups from History or Visitors. An individual visitor's group can also be changed from their Visitor Profile or Visit Details after clicking the edit button. |
In History check a box next to the visit and click Add to Group, select the group, and add a group comment (optional). In Visitors check a box next to the visitor and click Change Group then select the new group (or None to remove the assignment). |
Tags
While a visitor can only be assigned to one group, they can have an unlimited number of tags applied. These tags are visible on the initial detailed scan results screen in VeriScan apps, but on iOS and Android, you will need to click More Info to see or apply tags.
Tags are created and managed in VeriScan Cloud > Tags. Simply click  , name it, choose which location(s) it should apply to, and toggle "Is active" on, and it will appear as an option on your VeriScan devices association with the selected location(s).